
First, do your research. I found the plans for the Minotaur class cruisers in my copy of "Jane's AtWFS 1914". Since I build my models to a 1 /1200 "toy scale", the 520 foot long hull would need to be five inches long. The beam is an over-sized one and a half inches.

The materials for these ships would be 3/16" balsa sheet wood(I buy mine in 6"x36" planks), 1/16"x1/8" basswood strips (for gun barrels), 3/16" dowels (for stacks), 3/16"square basswood (for small turrets), 3/16"x1/4" basswood( for large turrets) 1/4"x3/8" balsa (for the bridge) and cocktail skewers (for the masts).

Next, the hulls cut from the 3/16' balsa plank. Two pieces, 1-1/2"x5" are glued and pressed for an hour under the weight of the flatiron. I have pressed up to five hulls under the iron at one time with fine results.

After the glue sets, it is time to draw the hull shape. I wanted a sleek look, so I marked the ends at the 1/4", 1/2", 3/4" 1" and 1-1/4" points. I went down the long sides and marked 1", 1-1/2" and 2". The end 3/4" mark was joined to the side 1" marks. The ends 1/2' and 1' marks were joined to their nearest side 1-1/2' marks, and the 1/4" and 1-1/4" end marks were joined to the side 2" marks. This was done at both bow and stern.

The razor saw was used to cut away scrap from the bow and stern.

The raised quarterdeck was built using the above method, then glued in place and weighted.
The rough hull and quarterdeck is sanded to a smoother shape.

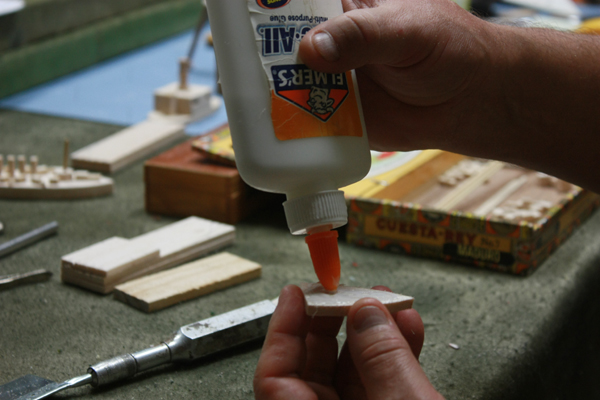
Small parts are mass produced. These include turrets, guns, stacks, bridges and masts. Here a pin vise is used to drill the mounting hole for a mast in the main bridge.

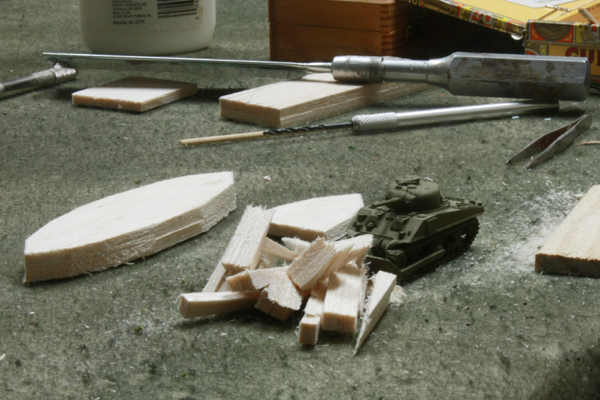
Here is a finished Minotaur next to a hull and all the small parts.

Work goes quickly at this stage. Mounting the small guns is tedious, though and requires tweezers for my hands.


The last part goes on!

The HMS Minotaur and sister ship Defence. Later that evening I finished the Shannon, and the HMS Warrior(1905)

Building these ships produced enough scrap balsa to heat several 15mm scale cities.
Start time to finish for four ships was less than two evenings, even with the modified pace of picture taking. It is fun work, and most ships are launched at a cost of $1.00US or less. This week I will give the finished models a coat of white glue as a sealer, then paint them and apply ensigns printed by Spike.

"On the Mediterranean patrol"
NEXT SUNDAY: " An Enemy Then Flying" The Goeben vs the Royal Navy; What if...?
Hi Steve,
ReplyDeleteAbsolutely love them! What a great idea. I was very interested in the technique for gun barrels - that is a really good idea and I guess by painting the top half the gun colour and the bottom half black would create the illusion of being an actual barrel.
Very neat indeed sir and I cant wait to see them in action!
All the best,
DC
David, I keep experimenting with gun ideas. My "big guns" have been dowels from the start. My first batch of armoured cruiser had no gun barrels at all, just small furniture plugs to represent the turrets or sponsons. My first light cruisers had small pieces of stripwood glued on the deck with no gun shield. I need to put up some pictures showing the development over two months time.
DeleteI do plan to paint them as you suggest, as soon as it is warm enough outside for the spray can of Testor's Sea Grey!
They WILL be in action in our next installment, trying to stop the SMS Goeben!
-Steve
Steve (and Spike),
ReplyDeleteWhat a great 'How to ...' blog entry.
You have taken my basic ideas and really developed them into something much better. Your models look just as I imagined Fred Janes' ones would.
Well done!
All the best,
Bob
Bob, you are too modest. I learned so much from your feature on the Schleswig-Holstein. For the first time that the formula for hull layouts just "clicked" for me. That was alwys my stumbling-block when trying to build a wooden ship. They looked more like the flat iron in my workshop!
Delete-Steve
S and S
ReplyDeleteGreat stuff and good tips. I have made some rough and ready Spanish American era ships using similar techniques but have much to learn from you. Photos are on my bloghttp://singlehandedadmiral.blogspot.ca/2011/03/santiago-project.html#.UJA--Y7_TIo
Cheers
PD
Dumb question
ReplyDeleteWhen you press the hulls - is the iron on?
PD
PD, I'll answer both of your comments here.
DeleteFirst I went to your site and am very impressed with your models. I, too need to build more from the Spanish-American War, as well as the Russo-Japanese. The pre-dreadnoughts make for a very good game, in a lot less space.
That iron is over a hundred years old, belonged to my great aunt, and must be heated in a fireplace. It is doing heroic work as a "hull press".
Please check in often. I post here at least every Sunday.
-Steve
Just found your site and am earnestly impressed! Your ships convey what they are in an elegant way. I've been building similar ships, but in a more kid friendly scale.
ReplyDeleteThanks for the inspiration
Thomas
www.skullandcrown.blogspot.com