For those of you who love details on your gaming tables...and who doesn't?....I am making my PDF file of naval ensigns available to share on Google Drive. You may need to create a Google account to download the file, but I believe anybody can view it beforehand.
The link is here > flags.pdf at Google Drive
Most major navies are represented, but if you are in need of a flag that isn't included, let me know in the comments and I'll try to add yours to my next PDF.
Until next time, happy gaming!
~Spike~

Thursday, December 13, 2012

Monday, December 10, 2012
MoBaS:Hampton Roads Virginia
Hopefully I can get back on schedule this week. Tonight i fought the
two naval actions at Hampton Roads, Virginia, that saw the introduction
of ironclads to the American navies. Using "Memoir of Battle at Sea
1860-70" and some paper ship models downloaded from http://www.mayheminpaper.papermakeit.com/Squirmydad%27s_Madness/Downloads.html
I was able to fight two interesting battles in about a half hour.

The first action saw the CSS Virginia steam out to attack the blockading vessels USS Congress and Cumberland. both Union ships were at anchor, and had to "raise steam" by rolling a d6 each turn until they each accumulated 12 points. They would then have a move of "1' on their first turn, and full speed of '2' on the next.
USS Minnesota was run aground, and had to roll each turn to try to back off the shoal. A d6 was rolled and the total tallied until "'25" was accumulated.

The Virginia moved in against Congress first, trading shots as soon as the two ships were in range. The ironclad placed a shell from the bow rifle through the vitals of the wooden ship for two floatation hits on her first shot. The southern vessel shrugged off a long range shot from Congress.
Continuing to close the range, both ships fired with some effect. Congress continued to work to get up steam, despite the hammering from the Virginia. Cumberland also readied for action.

Just as Virginia began to move up for a ramming attack, Congress hauled anchor and left its mooring. Virginia turned to port, and the ships traded broadsides, Congress began to sink.

Cumberland now was moving, trying to get out in front of the deadly ram. she, too opened fire on the Confederate vessel. Virginia answered with her bow gun.

Virginia again tried to turn in to ram, but the swifter vessel turned away. Again, close range broadsides were exchanged. Again the deadly Brooke rifles tore through the wooden walls of the US frigate. Cumberland settled on the bottom. Virginia, feeling the effects of the Northern guns, turned away to home, seeking repairs. She would return for the grounded Minnesota in the morning.

(Between battles, I rolled a d3, to allow Virginia to repair some of the five points of floatation damage taken in the first fight. Three points were repaired that night).
On steaming past the previous day's wreckage, Virginia's commander, Catesby ap Roger Jones was interested to find a small turreted vessel in place guarding the still-aground Minnesota. The monitor wasted no time in opening fire, landing a hit before Virginia's guns were in range.

Virginia steamed straight at the Federal ironclad, intending to test the ram. The Union captain moved his ship slightly, maintaining his position between the southern ship and its helpless target. Again the monitor landed a damaging shot on the armored ram.

Virginia turned to line up a ramming attack on the Union ship. Monitor slipped in close to the monster. Both ships unloaded punishing close range salvos. When the smoke cleared, both vessels back away from their foes. Enough damage had been done. There would be a time to settle this later.....

Enough damage had been done. There would be a time to settle this later.....
 Game Notes: MoBaS is a wonderful set of rules for smaller actions
such as these. The variable initiative system makes it very interesting
when you are close enough for ramming. The "critical point" rule keeps
captains from slugging it out at all costs.
Game Notes: MoBaS is a wonderful set of rules for smaller actions
such as these. The variable initiative system makes it very interesting
when you are close enough for ramming. The "critical point" rule keeps
captains from slugging it out at all costs.
Had Virginia succeeded in ramming another vessel,I was going to make a roll to see if she lost the ram, as she did in the actual battle (1-3, lost;4-6 still attached). One of the mounting flanges had been broken when attaching the 'beak' to the ship, and never replaced, causing the ram to be lost on day one. Amazingly, this was not noticed, despite the taking on of water from the damage.
The game was played on an 8x11 hex board.
NEXT WEEK:The Naval Battle of Memphis! Ellet Rams Galore!
I was able to fight two interesting battles in about a half hour.

The first action saw the CSS Virginia steam out to attack the blockading vessels USS Congress and Cumberland. both Union ships were at anchor, and had to "raise steam" by rolling a d6 each turn until they each accumulated 12 points. They would then have a move of "1' on their first turn, and full speed of '2' on the next.
USS Minnesota was run aground, and had to roll each turn to try to back off the shoal. A d6 was rolled and the total tallied until "'25" was accumulated.

The Virginia moved in against Congress first, trading shots as soon as the two ships were in range. The ironclad placed a shell from the bow rifle through the vitals of the wooden ship for two floatation hits on her first shot. The southern vessel shrugged off a long range shot from Congress.
Continuing to close the range, both ships fired with some effect. Congress continued to work to get up steam, despite the hammering from the Virginia. Cumberland also readied for action.

Just as Virginia began to move up for a ramming attack, Congress hauled anchor and left its mooring. Virginia turned to port, and the ships traded broadsides, Congress began to sink.

Cumberland now was moving, trying to get out in front of the deadly ram. she, too opened fire on the Confederate vessel. Virginia answered with her bow gun.

Virginia again tried to turn in to ram, but the swifter vessel turned away. Again, close range broadsides were exchanged. Again the deadly Brooke rifles tore through the wooden walls of the US frigate. Cumberland settled on the bottom. Virginia, feeling the effects of the Northern guns, turned away to home, seeking repairs. She would return for the grounded Minnesota in the morning.

(Between battles, I rolled a d3, to allow Virginia to repair some of the five points of floatation damage taken in the first fight. Three points were repaired that night).
On steaming past the previous day's wreckage, Virginia's commander, Catesby ap Roger Jones was interested to find a small turreted vessel in place guarding the still-aground Minnesota. The monitor wasted no time in opening fire, landing a hit before Virginia's guns were in range.

Virginia steamed straight at the Federal ironclad, intending to test the ram. The Union captain moved his ship slightly, maintaining his position between the southern ship and its helpless target. Again the monitor landed a damaging shot on the armored ram.

Virginia turned to line up a ramming attack on the Union ship. Monitor slipped in close to the monster. Both ships unloaded punishing close range salvos. When the smoke cleared, both vessels back away from their foes. Enough damage had been done. There would be a time to settle this later.....

Enough damage had been done. There would be a time to settle this later.....

Had Virginia succeeded in ramming another vessel,I was going to make a roll to see if she lost the ram, as she did in the actual battle (1-3, lost;4-6 still attached). One of the mounting flanges had been broken when attaching the 'beak' to the ship, and never replaced, causing the ram to be lost on day one. Amazingly, this was not noticed, despite the taking on of water from the damage.
The game was played on an 8x11 hex board.
NEXT WEEK:The Naval Battle of Memphis! Ellet Rams Galore!
Sunday, November 25, 2012
Two Books You Should Read
I am making a serious effort to read an average of one book per week this year. Here an reviews of the last two returned to the bookshelf completed.
First up is Paul G. Halpern's "The Naval War in the Mediterranean 1914-1918"(Naval Institute Press, 1987).
Any book of First World War naval history is doomed to be anticlimactic. Unless the author veers into "speculative fiction", there is NOT going to be a sea-going showdown in the Adriatic, Black Sea, or even in the North Sea. What emerges from this study by Paul Halpern is an incredibly documented examination of naval strategy, as influences by procurement, politics, and often personalities.
The major powers entered the final summer of peace expecting to one day see a major fleet action between the forces of France and Britain, on one side, and Italy and the Austro-Hungarian Empire on the other. When Italy chose to remain neutral, then eventually join the Allies, the Austrian fleet was facing a potentially overwhelming force. A combination of poor equipment, inter-Allied jealousy, poor allocation of resources, and a huge learning curve in anti-submarine warfare led to the Austrians being able to maintain a "fleet in being" long after their opponents should have forced their hand.
Halpern gives many examples of the logistical shortcomings faced by both sides. Due to the location of some Allied repair centers, in order to maintain thirty destroyers on station, it was necessary to have ninety available. Italian capital ships seldom left port, because of the threats of mines and submarines. Shortages of coal and oil kept many boilers 'cold' while in port. when an emergency arose, the ships needed were not ready. Wooden trawlers, so important to the maintenance of the anti-submarine Barrages, were on duty for such extended periods that their hulls became unseaworthy.
Submarine warfare dominates the action in the book. The political effects are discussed at length, especially the Austrian reaction to German unlimited warfare, and the use of Austrian flags on German subs, when attacking vessels belonging to nations not yet at war with Germany.
This book is not a "light" or easy read, but it is a very important one for those seeking to understand why the Allies did not pursue a more aggressive strategy in the Mediterranean and Adriatic. It deserves a place on the shelf of anyone interested in Naval or diplomatic history.
My second review is on a subject I never tire of studying: the Monitor and the Merrimack. William C. Davis wrote "Duel Between the First Ironclads" in 1975.
This book moves at a brisk pace, following the design and building of the first two ironclad ships to see battle. Some of the in-fighting among the designers and manufacturers is covered, particularly the animosity between Virginia designers John Porter and John Brooke. There is a good discussion of the design of the ships armored protection,and a basic description of the guns mounted on the two vessels.
Both of the days of battle at Hampton Roads are covered in some detail, as is the later history of both ships, and the men who commanded them. At only 170 pages, plus notes, this book is an ideal quick and enjoyable read, full of action. There are forty-one illustrations and photos.
NEXT WEEK: Memoir of Battle at Sea: Hampton Roads 1862
First up is Paul G. Halpern's "The Naval War in the Mediterranean 1914-1918"(Naval Institute Press, 1987).
Any book of First World War naval history is doomed to be anticlimactic. Unless the author veers into "speculative fiction", there is NOT going to be a sea-going showdown in the Adriatic, Black Sea, or even in the North Sea. What emerges from this study by Paul Halpern is an incredibly documented examination of naval strategy, as influences by procurement, politics, and often personalities.
The major powers entered the final summer of peace expecting to one day see a major fleet action between the forces of France and Britain, on one side, and Italy and the Austro-Hungarian Empire on the other. When Italy chose to remain neutral, then eventually join the Allies, the Austrian fleet was facing a potentially overwhelming force. A combination of poor equipment, inter-Allied jealousy, poor allocation of resources, and a huge learning curve in anti-submarine warfare led to the Austrians being able to maintain a "fleet in being" long after their opponents should have forced their hand.
Halpern gives many examples of the logistical shortcomings faced by both sides. Due to the location of some Allied repair centers, in order to maintain thirty destroyers on station, it was necessary to have ninety available. Italian capital ships seldom left port, because of the threats of mines and submarines. Shortages of coal and oil kept many boilers 'cold' while in port. when an emergency arose, the ships needed were not ready. Wooden trawlers, so important to the maintenance of the anti-submarine Barrages, were on duty for such extended periods that their hulls became unseaworthy.
Submarine warfare dominates the action in the book. The political effects are discussed at length, especially the Austrian reaction to German unlimited warfare, and the use of Austrian flags on German subs, when attacking vessels belonging to nations not yet at war with Germany.
This book is not a "light" or easy read, but it is a very important one for those seeking to understand why the Allies did not pursue a more aggressive strategy in the Mediterranean and Adriatic. It deserves a place on the shelf of anyone interested in Naval or diplomatic history.
My second review is on a subject I never tire of studying: the Monitor and the Merrimack. William C. Davis wrote "Duel Between the First Ironclads" in 1975.
This book moves at a brisk pace, following the design and building of the first two ironclad ships to see battle. Some of the in-fighting among the designers and manufacturers is covered, particularly the animosity between Virginia designers John Porter and John Brooke. There is a good discussion of the design of the ships armored protection,and a basic description of the guns mounted on the two vessels.
Both of the days of battle at Hampton Roads are covered in some detail, as is the later history of both ships, and the men who commanded them. At only 170 pages, plus notes, this book is an ideal quick and enjoyable read, full of action. There are forty-one illustrations and photos.
NEXT WEEK: Memoir of Battle at Sea: Hampton Roads 1862
Sunday, November 18, 2012
Dogger Bank-Memoir of Battle at Sea
One of the indelible images of the first World War is the photograph of the SMS Blucher sinking at the Battle of Dogger Bank. Tonight I refought the battle using Bob Cordery's Memoir of Battle at Sea rules, with a few modifications.
First, i used the same ratings for all of the battle-cruisers involved in the action . They were given a speed of 4 hexes per turn, a gun range of 10 hexes, flotation value of 12, and a critical point of 4. I also allow capital ships an 'anti- torpedo boat" fire range of 4 hexes. This has no bearing on the use of the main battery.
I restricted the guns on torpedo boats and destroyers to targets of "light cruiser' and smaller classes.
I tried an experimental 'critical damage' rule. It is this. any "6" rolled against a ship is re-rolled. A 1-4 is still two flotation hits. A "5" is one flotation hit and a loss of one gun range/dice. A " 6" is a loss of one flotation factor and a loss of one hex of speed.

The battle opened with the British battle-cruisers gaining on the Germans. the German light cruisers and torpedo boats fanned out to set up a screen.One light cruiser is hit early.

Seydlitz leads the way home, followed by Moltke, Derflinger, and the armored cruiser Blucher.
The light cruisers and torpedo boats form a scrum. The Germans try valiantly to slow down the British ships.

Hit by shells from the German battle line, then torpedoed, HMS Lion sinks suddenly.

Harwich force arrives, to sink or chase off the German predators. Tiger is also hit, while landing shots on Derflinger.

Tiger must leave the action, badly damaged. Harwich force begins to close in on the damaged and slowly moving Blucher.

Princess Royal, New Zealand, and Indomitable continue to pound the German ships.

Blucher slides beneath the waves. She was not fast enough to escape the British, and under-gunned to stand against them.

The British send a late salvo, sinking the Derflinger, as well. The other two German capital ships cleared the bar and escaped.

German losses were severe. One battle cruiser, one armored cruiser, two light cruisers, and seven torpedo boats. The British lost flag-ship Lion, one light cruiser, and three destroyers. Two battle-cruisers and three light cruisers were also severely damaged, and the British would be without them for a number of months.
GAME NOTES. The game was played on a 6x4 foot table. It took only thirty minutes to play out the action.
The critical damage rule worked well in this game, with the emphasis on a speedy get-a-way for the Germans, and a rapid pursuit for the British. Losing a point of speed was fatal to two German vessels.
I cut the number of actual destroyers and torpedo boats in half, and still had a table full of them. Next time I run this one, I will use a 1-3 ratio.
Next Week: A couple of book reviews.
First, i used the same ratings for all of the battle-cruisers involved in the action . They were given a speed of 4 hexes per turn, a gun range of 10 hexes, flotation value of 12, and a critical point of 4. I also allow capital ships an 'anti- torpedo boat" fire range of 4 hexes. This has no bearing on the use of the main battery.
I restricted the guns on torpedo boats and destroyers to targets of "light cruiser' and smaller classes.
I tried an experimental 'critical damage' rule. It is this. any "6" rolled against a ship is re-rolled. A 1-4 is still two flotation hits. A "5" is one flotation hit and a loss of one gun range/dice. A " 6" is a loss of one flotation factor and a loss of one hex of speed.

The battle opened with the British battle-cruisers gaining on the Germans. the German light cruisers and torpedo boats fanned out to set up a screen.One light cruiser is hit early.

Seydlitz leads the way home, followed by Moltke, Derflinger, and the armored cruiser Blucher.
 |
| "Yes, I have too much stuff on my shelves" |
The light cruisers and torpedo boats form a scrum. The Germans try valiantly to slow down the British ships.

Hit by shells from the German battle line, then torpedoed, HMS Lion sinks suddenly.

Harwich force arrives, to sink or chase off the German predators. Tiger is also hit, while landing shots on Derflinger.

Tiger must leave the action, badly damaged. Harwich force begins to close in on the damaged and slowly moving Blucher.

Princess Royal, New Zealand, and Indomitable continue to pound the German ships.

Blucher slides beneath the waves. She was not fast enough to escape the British, and under-gunned to stand against them.

The British send a late salvo, sinking the Derflinger, as well. The other two German capital ships cleared the bar and escaped.

German losses were severe. One battle cruiser, one armored cruiser, two light cruisers, and seven torpedo boats. The British lost flag-ship Lion, one light cruiser, and three destroyers. Two battle-cruisers and three light cruisers were also severely damaged, and the British would be without them for a number of months.
GAME NOTES. The game was played on a 6x4 foot table. It took only thirty minutes to play out the action.
The critical damage rule worked well in this game, with the emphasis on a speedy get-a-way for the Germans, and a rapid pursuit for the British. Losing a point of speed was fatal to two German vessels.
I cut the number of actual destroyers and torpedo boats in half, and still had a table full of them. Next time I run this one, I will use a 1-3 ratio.
Next Week: A couple of book reviews.
Tuesday, November 13, 2012
An Unexpected Bargain
I have been checking Amazon every day since June, hoping to find a "good" or better copy of "Conway's All the World's Fighting Ships 1860-1905" for less than $80.00 US. Tonight I bought one online for $25.00. The next lowest price was $90.00. Persistence pays off, sometimes! Now to go sit by the mailbox waiting, like I did at the age of four:-)
-Steve
-Steve
Sunday, November 11, 2012
A Slight Delay.....Hopefully
I am sorry I don't have today's entry ready. We are dealing with a problem with a family member. Hopefully, everything will soon resolve itself properly, and I can resume my writing schedule in a few days.
-Steve
-Steve
Sunday, November 4, 2012
Fast and Easy French Pre-Dreadnoughts
When I first examined a copy of "Jane's Fighting Ships 1914" the ship that grabbed my imagination more than any other was the French pre-dreadnought "Bouvet", laid down in 1893. The photograph and plan drawing showed an amazing collection of turrets, housing guns of several sizes. The bulge of the tumble-home hull with the low turrets riding thereon, gave the appearance of a vessel already sinking. Looking at the pictures of "Henri IV", "Carnot", and "Charles Martel" one realizes the French naval architects were working with an totally different vision than that of other navies.
One of my first games of "Memoir of Battle at Sea" was to be a match-up of German and French pre-dreadnoughts. I had the four German ships built in the style of Bob Cordery's SMS Schleswig-Holstein model. Now I needed the French opponents. I did not feel I had the ability to accurately carve the odd contours of the French style hull, but wanted to suggest it in some way. I laid out the basic cuts to be made on a four inch by two inch piece of 3/16" balsa. I also cut a four inch by 3/4" piece of 3/16" wood to represent the main deck.

Both pieces were cut to shape with an X-acto hand saw, then sanded. The outer edge of the larger piece was sanded to suggest the inward slope of the hull.

The two pieces are glued together, then weighted until they dry.

The upper hull/deck is sanded to match the contours of the lower hull.

These are the other pieces. With the exception of the four half inch sections of 1/16" dowel(guns) and the 1/2" by 7/8" piece of balsa next to them, every piece here is a pre-milled hardwood fitting available at Hobby Looby or other craft stores. Two are small spools(stacks) and there are three sizes of furniture plug (various turrets). A small wooden cube is also used (chartroom).

Here are the first pieces attached. Support for stacks, chartroom, two medium turrets, and the sponson for the flank main turret.

Next to be added are the stacks, and the fore and aft small turrets.

Holes are drilled for the main guns, which are then glued in place. They are propped on a piece of scrap to dry.

Main batteries are added. All she needs is paint and a flag.

Here is an early effort with a coat of Testor's Gull Grey and one of Spike's printed flags.

Total cost of materials is about $2 US. Time for construction is about thirty minutes each. So far they have an 0-2 record against the High Seas Fleet.
NEXT SUNDAY: GAMING THE BATTLE OF DOGGER BANK, in Words and Pictures
One of my first games of "Memoir of Battle at Sea" was to be a match-up of German and French pre-dreadnoughts. I had the four German ships built in the style of Bob Cordery's SMS Schleswig-Holstein model. Now I needed the French opponents. I did not feel I had the ability to accurately carve the odd contours of the French style hull, but wanted to suggest it in some way. I laid out the basic cuts to be made on a four inch by two inch piece of 3/16" balsa. I also cut a four inch by 3/4" piece of 3/16" wood to represent the main deck.

Both pieces were cut to shape with an X-acto hand saw, then sanded. The outer edge of the larger piece was sanded to suggest the inward slope of the hull.

The two pieces are glued together, then weighted until they dry.

The upper hull/deck is sanded to match the contours of the lower hull.

These are the other pieces. With the exception of the four half inch sections of 1/16" dowel(guns) and the 1/2" by 7/8" piece of balsa next to them, every piece here is a pre-milled hardwood fitting available at Hobby Looby or other craft stores. Two are small spools(stacks) and there are three sizes of furniture plug (various turrets). A small wooden cube is also used (chartroom).

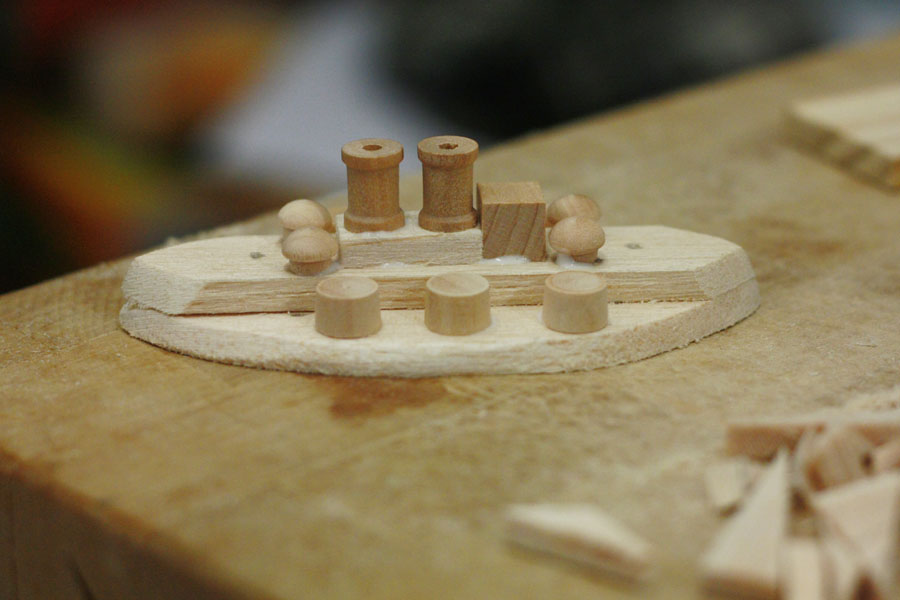
Here are the first pieces attached. Support for stacks, chartroom, two medium turrets, and the sponson for the flank main turret.

Next to be added are the stacks, and the fore and aft small turrets.
Holes are drilled for the main guns, which are then glued in place. They are propped on a piece of scrap to dry.

Main batteries are added. All she needs is paint and a flag.

Here is an early effort with a coat of Testor's Gull Grey and one of Spike's printed flags.

Total cost of materials is about $2 US. Time for construction is about thirty minutes each. So far they have an 0-2 record against the High Seas Fleet.
NEXT SUNDAY: GAMING THE BATTLE OF DOGGER BANK, in Words and Pictures
Subscribe to:
Posts (Atom)